Shop this story

Nail Art Basics
Key Takeaways to Nail Art Basics
| Technique | Description |
|---|---|
| Basic Painting | Learn to apply nail polish evenly and smoothly. |
| Dotting | Use a dotting tool to create simple, intricate designs. |
| Stamping | Transfer designs from stamping plates to nails for detailed patterns. |
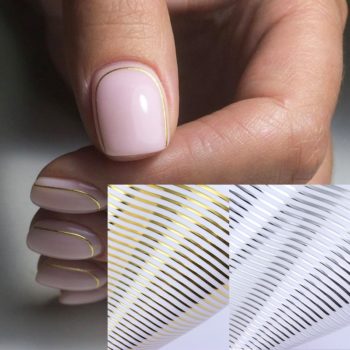
| Taping | Use tape as a guide for creating straight lines and geometric shapes. |
| Glitter Application | Master the art of applying glitter for a sparkling finish. |
| Rhinestone Placement | Learn to apply and secure rhinestones for added bling. |
| Decal Application | Apply nail decals or stickers for quick, detailed art. |
Nail art is an expansive and creative field that allows for personal expression through intricate designs and vibrant colours on the small canvas of your nails. Whether you’re a beginner or have dabbled in nail art, mastering the basics is essential for creating eye-catching designs. This guide will walk you through the techniques, tools, and materials you need to start your journey into the world of nail art.
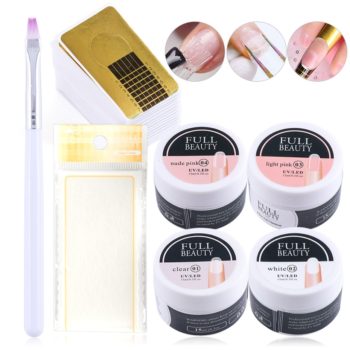
 Essential Tools and Materials for Nail Art Basics
 Essential Tools and Materials for Nail Art Basics
- Nail Polish: The foundation of any nail art, available in countless colours and finishes. Start with primary colours and a top-quality topcoat for longevity. Check out our comprehensive selection here.
- Dotting Tools: Essential for creating dots, swirls, and intricate designs. They come in various sizes for different effects.
- Stamping Kits: Include a stamping plate, scraper, and stamper. They’re great for transferring detailed patterns to nails. Explore our stamping kits here.
- Tape: Striping or scotch tape can help create clean lines and geometric shapes.
- Glitters and Rhinestones: Add sparkle and texture to your designs. We have a beautiful range of AB Colourful Hotfix Rhinestones.
- Nail Decals and Stickers: For an easy way to add complex designs. Our Blue Butterfly 3D Nail Stickers are perfect for beginners.
- Brushes and Liners: For detailed art and fine lines. A starter set like our 5-20 Piece Nail Art Brush Set is a significant investment.
Nail Art Basic Techniques
 Nail Art Basic Techniques
- Preparation: Start with clean, shaped nails. Apply a base coat to protect your nails and create a smooth surface.
- Basic Painting: Practice applying nail polish evenly. Two thin coats are better than one thick one.
- Dotting: Dip the dotting tool into the polish and gently press it onto the nail. Experiment with different sizes and patterns.
- Stamping: Apply polish to the stamping plate, scrape off excess, press the stamper onto the design, and stamp onto the nail.
- Taping: Use tape as a stencil or guide for creating designs. Remove the tape while the polish is still wet for clean lines.
- Applying Glitter and Rhinestones: To apply glitter, apply a layer of polish or glue and sprinkle on. To apply rhinestones, use a dot of nail glue and place them with tweezers or a dotting tool.
Practice and Patience
Nail art requires practice and patience. Start with simple designs and gradually move to more complex patterns as you become more comfortable with the tools and techniques. Remember, perfection comes with practice, and even the most straightforward designs can look stunning with a bit of creativity.
Advanced Techniques and Inspiration
Exploring advanced techniques can enhance your designs and creativity as you become more confident in your basic nail art skills. Here are some advanced methods to consider incorporating into your next nail art project and inspirational ideas to spark your imagination.
Advanced Techniques
 Advanced Techniques
- Marbling: Achieve a stunning marbled effect by swirling together different nail polish colours in water, then dipping your nail into the mixture.
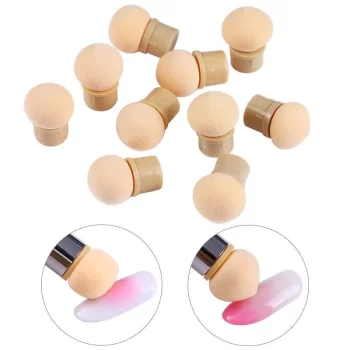
- Ombre/Gradient: A sponge creates a smooth transition between colours. Depending on the colour contrast, this technique can range from subtle to striking.
- 3D Designs: Elevate your nail art by adding three-dimensional elements such as beads, flowers, or sculpting gel for a raised effect. Our 3D Space Nail Stickers offer a simple way to add depth.
- Reverse Stamping: This involves colouring a stamped design on a stamper before transferring it to the nail, allowing for multicoloured stamp designs.
- Water Decals: Similar to stickers but thinner, water decals are soaked in water and then applied to the nail. They offer intricate designs with a paint-like finish. Check out our Harunouta Black Lines Flower and Leaves Water Decals for elegant options.
Inspirational Ideas
 Inspirational Ideas
- Seasonal Themes: In your nail art, reflect the colours and motifs of the current season. For spring, consider pastel colours and floral patterns; summer calls for bright, vibrant hues and beach themes; autumn can be captured with warm tones and leaf designs; and winter is perfect for fantastic colours and sparkling accents.
- Holiday Celebrations: Holidays offer a plethora of inspiration. From spooky Halloween designs to festive Christmas art, celebrating through your nails adds extra joy to any occasion.
- Fashion-Inspired: Draw inspiration from current fashion trends or iconic designer patterns. Think of translating a fabric pattern or the aesthetic of a recent runway show onto your nails.
- Cultural Art: Explore patterns and designs from different cultures worldwide for a unique and meaningful nail art design.
- Abstract Art: Let your creativity run wild with abstract designs. Mix colours, shapes, and textures for a truly one-of-a-kind look.
Resources for Continuous Learning
To stay updated with the latest trends and techniques in nail art, regularly visit blogs, YouTube channels, and Instagram accounts dedicated to nail design. Participating in online forums or social media groups can also provide support, inspiration, and a sense of community with fellow nail art enthusiasts.
As you advance in your nail art journey, remember that creativity and experimentation are essential. Don’t be afraid to try new designs, mix techniques, or create your unique style. The world of nail art is vast and versatile, offering endless possibilities for personal expression. Whether you prefer elegant, understated designs or bold, elaborate creations, there’s a technique and style for everyone.
Latest Nail Art Trends and How to Incorporate Them
The world of nail art is dynamic, with new trends emerging every season. Staying ahead of these trends fuels your creativity and ensures your designs remain fresh and exciting. In this segment, we’ll dive into some of the latest nail art trends 2024 and provide tips on incorporating them into your creations.
Trend #1: Minimalist Chic
 Trend #1: Minimalist Chic
Simplicity reigns supreme with the minimalist chic trend. Think single-line art, negative space designs, and tiny geometric shapes. These designs often feature a neutral colour palette punctuated with black or metallic accents for a touch of sophistication.
- How to Incorporate: Use a fine liner brush to create delicate lines or shapes. Leave areas unpainted to embrace your natural nails and create a negative space effect.
Trend #2: Bold Patterns and Colors
 Trend #2: Bold Patterns and Colors
On the opposite spectrum, bold patterns and vibrant colours are also trending. These designs, which range from psychedelic swirls to abstract colour blocking, are about making a statement.
- How to Incorporate: Don’t be afraid to mix colours and patterns. Use tape to create sharp lines for colour blocking or a detail brush for intricate designs. To get started, explore our vibrant Lilycute Fluorescent Matte Gel Nail Polish.
Trend #3: Textured Nails
 Trend #3: Textured Nails
Textured nails, featuring everything from chunky glitter to caviar beads, add a tactile element to nail designs. This trend is perfect for those who want to add dimension and a playful touch to their nails.
- How to Incorporate: Apply a layer of clear polish or gel and sprinkle on your texture of choice. Our Multicolor Holographic Neon Nail Powder can add a unique texture and sparkle.
Trend #4: Eco-Friendly and Natural
 Trend #4: Eco-Friendly and Natural
Sustainability is becoming a priority, with a shift towards eco-friendly products and natural, understated nail designs. Think soft, earthy tones and materials that are kind to the planet.
- How to Incorporate: Choose non-toxic and cruelty-free polishes and products. Embrace natural beauty with soft, muted tones and simple designs.
Trend #5: Retro Revival
 Trend #5: Retro Revival
Retro designs from the ’60s, ’70s, and ’80s, including mod patterns, psychedelic colours, and disco glitter, are making a comeback. This trend is perfect for those who love vintage flair and vibrant designs.
- How to Incorporate: Dive into our collection of 5D Firework Stickers for a retro vibe, or use dotting tools and striping tape to recreate vintage patterns and shapes.
Staying Inspired
Keeping up with trends doesn’t mean you have to follow them to the letter. Use them as inspiration to create something that feels true to your style. Mixing and matching elements from different trends can create unique and personal designs that stand out.
Remember, the most important trend to follow is the one that makes you happy and allows you to express your creativity. Whether you’re drawn to minimalist designs or prefer to experiment with bold patterns and textures, the key is to have fun and enjoy the process of creating beautiful nail art.
Leave a comment